From DevConf 2019 in Brno, Czechia.
Category: Tech
Today I Moved to Silverblue
Today I took the plunge replacing my aging Fedora 26 install with Fedora Silverblue. What is Silverblue you ask?
Silverblue is the new face of Fedora Atomic Workstation from Project Atomic. With good support for container-focused workflows, this variant of Fedora Workstation targets developer communities. If you want to emphasize that it is part of the Fedora project, calling it Fedora Silverblue is fine, too.
Source: https://docs.teamsilverblue.org/

As a long time member of Project Atomic I had always wanted to use Atomic Workstation for my work laptop. I was keenly aware of the advantages of using an ostree based system on servers and it only made sense to use the same technology locally. However, time generally kept me from making the change. Switching to Atomic Workstation was always the 3rd or 4th thing on my TODO list. Today there was time.
Step 1: Backing Up
Technically speaking, one should be able to install an operating system without the need to back up everything up. However, if backups don’t happen and something goes wrong you’re going to have a bad time. Today I spent multiple hours combing through my home directory looking for things that must be backed up just in case. After finding everything required and placing it on local removable encrypted disk I moved on to step 2.
Step 2: Creating the Media
I grabbed the ISO from the Silverblue site and created the media the old school way. The instructions on the download page are great and I’m sure they work fine, but I’m so used to using dd for media copies I just went with that:
$ sudo dd if=Fedora-AtomicWorkstation-ostree-x86_64-28-1.1.iso of=/dev/sdb
Warning: If you do end up using dd make double sure your output file (of=) is pointed at the disk you are expecting!!!
Step 3: Install
And here is where the excitement for me really began. The official installation guide is quite good. I ended up following the manual partition instructions as it was similar to how I normally install vanilla Fedora. I set up my disks, and kept my old /home partition and mounting it to /var/home per instructions. The only additional thing I did that wasn’t in the instructions was I went into the Network & Host Name where I connected to WiFi and changed my host name before clicking Begin Installation.
Boom

This gave me some anxiety because at this point I had blown away my root partition so I didn’t really have a workable system to use if the installation didn’t work. So I did what any sane person would do and I decided to reboot and try again.
Second time’s the charm
This time I followed the same pattern except I didn’t connect to WiFi. I did still set my host name though. Installation went without a hitch and within about 7 minutes it was time to reboot into my new system.
Step 4: Initial Set Up
The machine rebooted, I unlock my encrypted partition, and everything looks good. A greeter popped up to set up a user, etc.. Everything you expect from a modern GNU/Linux system occurred. I figured this is the best time to update the system to the newest image so I drop to a terminal and execute:
# rpm-ostree upgrade
For whatever reason pulling the update ended up being slow. Really slow. After 25 minutes the update exited with failure. I tried adding –check just to make sure there was literally an update, and it failed as well. For the heck of it I rebooted and did it again and upgrading succeeded. Again, the network download was really slow. This time it took around 35-40 minutes to pull the update but once it was pulled down the deployment happened perfectly.
Most things on Silverblue should be installed via Flatpak or executed in a container via podman or docker. There were a few tools I decided to overlay onto the deployment. These packages were:
- tmux – terminal multiplexer
- weechat – console IRC client
- rpmdevtools – mainly for rpmdev-extract
In fairness weechat these could all easily run via container, but to get up and going quickly I decided to overlay them for the time being. The most important one (for me) was rpmdevtools as there were a few packages which refused to overlay and my best move was to extract the contents (which were config files) and move them to the right locations in /etc. Not ideal, but not Silverblue’s fault.
Step 4: Install Editor
For this I decided to go with flatpak. First I needed to add the flathub remote which can be found here. Next I needed to add it as a remote:
$ sudo flatpak remote-add flathub /etc/flatpak/remotes.d/flathub.flatpakrepo
Then install my editor:
$ sudo flatpak install flathub com.visualstudio.code
Required runtime for com.visualstudio.code/x86_64/stable (runtime/org.freedesktop.Sdk/x86_64/1.6) found in remote flathub
Do you want to install it? [y/n]: y
Installing in system:
org.freedesktop.Sdk/x86_64/1.6 flathub fd7d657c9a36
org.freedesktop.Platform.VAAPI.Intel/x86_64/1.6 flathub 82006efc71d3
org.freedesktop.Platform.ffmpeg/x86_64/1.6 flathub d757f762489e
org.freedesktop.Sdk.Locale/x86_64/1.6 flathub 346dd3511a8c
com.visualstudio.code/x86_64/stable flathub 6cba55350228
 permissions: ipc, network, pulseaudio, x11, dri
 file access: host
 dbus access: org.freedesktop.Notifications, org.freedesktop.secrets
Is this ok [y/n]: y
Installing: org.freedesktop.Sdk/x86_64/1.6 from flathub
[####################] 17 delta parts, 148 loose fetched; 324907 KiB transferred in 35 seconds
Now at fd7d657c9a36.
Installing: org.freedesktop.Platform.VAAPI.Intel/x86_64/1.6 from flathub
[####################] 1 delta parts, 2 loose fetched; 2623 KiB transferred in 1 seconds
Now at 82006efc71d3.
Installing: org.freedesktop.Platform.ffmpeg/x86_64/1.6 from flathub
[####################] 1 delta parts, 2 loose fetched; 2652 KiB transferred in 1 seconds
Now at d757f762489e.
Installing: org.freedesktop.Sdk.Locale/x86_64/1.6 from flathub
[####################] 4 metadata, 1 content objects fetched; 14 KiB transferred in 0 seconds
Now at 346dd3511a8c.
Installing: com.visualstudio.code/x86_64/stable from flathub
[####################] Downloading: 94.7 MB/94.4 MB (3.6 MB/s)
Now at 6cba55350228.
Lastly, verify it installed as expected:
$ flatpak run com.visualstudio.code
For the heck of it I also checked to see if it would add the program to the Gnome Menu and it was there!
My next steps will be getting some dev containers for languages I tend to use the most frequently.
Step 5: Be Happy
The end result is that I’m sitting here using Silverblue writing a blog post on setting up Silverblue. Was it 100% smooth with no issues? No, but it was smooth enough. The change should force me to start doing things I should already be doing in containers … in containers.
If you are interested in running on Silverblue as well I recommend giving it a shot. Take a gander at the main website and, if you’re ready to truly move your workflow to containers and flatpaks, join in!
flask-track-usage 2.0.0 Tutorial
Check out John Dupuy’s video on getting up and running with flask-track-usage 2.0.0!
flask-track-usage 2.0.0
flask-track-usage 2.0.0 has been released! Thanks to all who helped provide patches and test. Note: 2.0.0 is the recommended upgrade version from 1.1.0. 1.1.1 was released for those who are unable to make the needed changes to move to 2.x. You can check out the latest docs over at readthedocs.
The changes include:
- MANIFEST.in: Add alembic to dist
- CONTRIBUTORS: Add John Dupuy
- py3: Fix import issue with summarization
- .travis: Change mysql driver
- test: Fix summerize tests for py3
- travis: Add 3.6
- docs: Quick fixes
- README.md: Update docs to rtd
- Use parens for multilines
- Update versions to 2.0.0
- sql: Increase ip_info from 128 to 1024
- alembic: Upgrade ip_info from 128 to 1024
- alembic: Support for upgrading SQL schema
- sql: Create table if it is not present
- couchdb: Add track_var and username
- redis: Add track_var and username
- Adding user_defined variable field to storage
- Hooks: add new hooks system
- test: Skip mongoengine if connection can not be made
- storage: Rename to PrinterWriter
- output: Add OutputWriter
- storage: Create base class and Writer
- requirements: Added six
- Copyright now a range
- Add CONTRIBUTORS
- doc: Add note about py2 and 3
- py3: Fix most obvious offenders
- Move mongoengine ref in Travis CI config
- Update Travis CI config to include mongoengine lib
- pep8 fixes
- MongoEngineStorage: updated docs; added get_usage
- added testing
- moved MongoEngineStorage to mongo.py
- doc: Minor updates for a future release
- Initial support for multiple storage backends
- Update versions to denote moving towards 2.0.0
- Added MongoEngineStorage code; adding test next.
- docs: Update version to 1.1.1
- release: v1.1.1
- Updates for freegeoip function
- test: Update sqlalchemy test for updated flask
- test: Update mongo test for updated flask
- test: test_data works with current Flask results
- travis: Force pymongo version for travis
- storage: Minor doc and structure updates for new backends.
- Redis support
- Added CouchDB integration. (#30)
flask-track-usage 2.0.0 testing
flask-track-usage is nearing a new milestone: 2.0.0. This new release will include a few bugfixes and a number of enhancements. The two that stick out are time aggregate functions in the form of hooks, split between Storage and Writer classes, and the ability to store custom date via a track_var global. Currently the work is being housed in a branch but will be updated and merged once 2.0.0 has a little time for testing. Some highlights in 2.0.0 include:
- alembic: Support for upgrading SQL schema
- sql: Create table if it is not pres
- entcouchdb: Add track_var and username
- redis: Add track_var and username
- user_defined variable field to storage
- Hooks: add new hooks system
- test: Skip mongoengine if connection can not be made
- storage: Rename to PrinterWriter
- output: Add OutputWriter
- storage: Create base class and Writer
- requirements: Added six
- doc: Add note about py2 and 3
- freegeoip: Fix missing attribute
- py3: Fix most obvious offenders
- Move mongoengine ref in Travis CI config
- Update Travis CI config to include mongoengine lib
Help test the 2.0.0 branch by cloning and installing in your development environment!
Commissaire at DevConf 2017
Commissaire had a presence this year at DevConf.cz. Checkout out our video as well as other really cool stuff.
Spy DNA Pre Alpha Review

I love strategy games. I spend way too much time indulging in SRPGs, building empires in 4x games, trying to become the best trader in merchant style games, getting my squad out alive in tactical games, and clicking faster then other people in real-time strategy games. I recently got a pre-alpha copy of Shy Snake‘s Spy DNA to play around with. If you are not familiar with it, Spy DNA is a squad based tactical role playing game that prides itself with being grounded in real life mechanics. If you want some examples think Syndicate or X-COM but with a more free moving system rather than turn movement.
The Demo
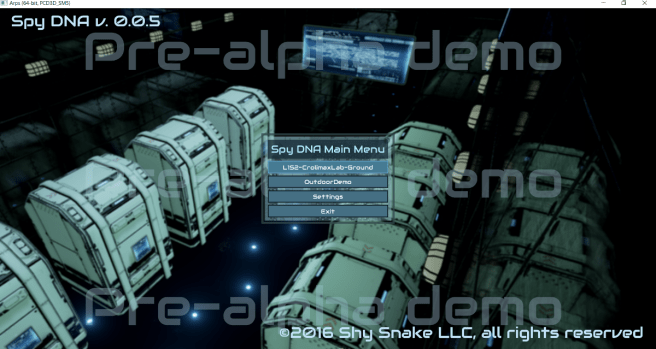
The pre-alpha demo provides two previews of game play. The first being Crolimax Lab and the second being the outdoor combat demo.
Crolimax Lab
 The lab demo takes you through a bit of the story. I talked with a number of folks working at the lab and learn what the lab is for, the history of the organization, and what I would be doing for them. I ended up using this area to get used to the controls. One thing that got me over and over was the camera movement. I kept wanting to use WASD to move the camera with Q and E to rotate. I’m not sure why I kept gravitating towards those bindings but, for me, they would make more sense than the arrow keys. In any case I’m sure Shy Snake will either add similar bindings or will be able to explain why the arrow keys make more sense for Spy DNA.
It was during this demo I noticed the bottom left camera. This is known as the “body cam” and is quite interesting and useful. As the squad member moves around you can watch their movement from their point of view. This is helpful for when you want to make sure you are covered or verify you have a clear line of site while still keeping your eye on the over all tactical view of the theater.
Outdoor Combat Demo
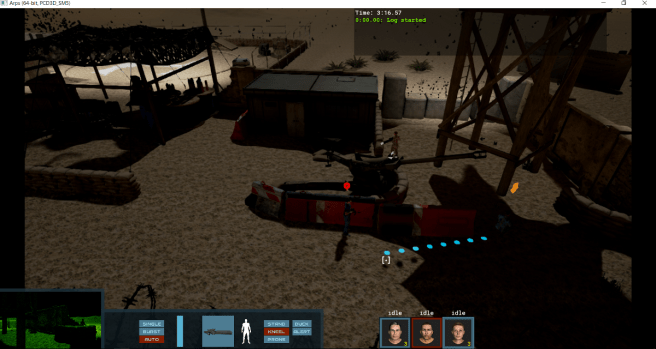 In the outdoor combat demo you get a three member squad and are faced with an encampment of enemies keeping patrol. For some reason one of the members always started far off the screen, but this is pre-alpha after all! In any case, this is where the fun really begins! I was able to sneak in and around a few guards before needing to start taking out some of them. By default you move quickly from point to point but, by clicking and holding, you can change how you traverse terrain allowing for sneaking and other options.
As I played I picked up the mechanics around the sight cam. At first I misinterpreted what I was seeing and didn’t understand why I kept missing almost every shot but after a few more tries it became clear how it works (and it totally makes sense).
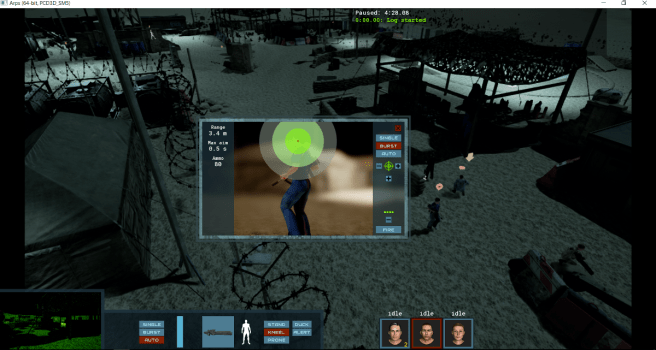
The pre-alpha manual states that the innermost green circle is where 50% of shots will land, the yellow circle is where 90% will land, and the outermost where 99% of shots will land. You can tweak the shot making the entire circle larger or smaller, move it around the target, select the type of shot you want to take (from single shot, burst, and auto “spray and pray”), as well as the amount of bullets to be used.
Following the realistic vibe you don’t have infinite anything and landing a shot causes real damage. There are no over the top 40 shot kills here and it’s a breath of fresh air!
One thing I found myself doing a lot was making use of the pause. I think this is due to how many other games in the past relied on turn based movement and my brain wanting to keep trying to fit Spy DNA into that pattern. With a full manual or tutorial map and a little practice I believe I could really get into the more free movement system. Until then I can’t stop myself from wanting to use pause.
Conclusion
Obviously, being pre-alpha, there were a decent amount of bugs present (mainly camera placement/control related) but the basic ideas came through and came through well. Many people who enjoy games like Jagged Alliance or Silent Storm are still playing them as the AAA or indie game industries have not really kept up with the game style. It’s a pity as well as tactical games can be very rewarding. Spy DNA feels like it could become a very refreshing entry into a genre which needs a revival.
Programmatic Ansible Middle Ground
Forward
About a year ago serversforhackers posted a great article on how to run Ansible programamatically Since then Ansible has had a major release which introduced changes within the Python API.
Simulating The CLI
Not that long ago Jason DeTiberus and I were talking about how to use Ansible from within other Python packages. One of the things he said was that it should be possible to reuse the command line code instead of the internal API if you hook into the right place. I finally had some time to take a look and it seems he’s right!
If you took a look at the 2.0 API you’ll see there is a lot more power handed over to you as the developer but with that comes a lot of code. Code that for many will be nearly copy/paste style code directly from command-line interface code. So when there is not a need for the extra power why not just reuse code that already exists?
import os  # Used for expanding paths

from ansible.cli.playbook import PlaybookCLI
from ansible.errors import AnsibleOptionsError, AnsibleParserError

def execute_playbook(playbook, hosts, args=[]):
    """
    :param playbook: Full path to the playbook to execute.
    :type playbook: str
    :param hosts: A host or hosts to target the playbook against.
    :type hosts: str, list, or tuple
    :param args: Other arguments to pass to the run.
    :type args: list
    :returns: The TaskQueueHandler for the run.
    :rtype: ansible.executor.task_queue_manager.TaskQueueManager.
    """
    # Set hosts args up right for the ansible parser. It likes to have trailing ,'s
    if isinstance(hosts, basestring):
        hosts = hosts + ','
    elif hasattr(hosts, '__iter__'):
        hosts = ','.join(hosts) + ','
    else:
        raise AnsibleParserError('Can not parse hosts of type {}'.format(
            type(hosts)))

    # Create the cli object
    cli_args = ['playbook'] + args + ['-i', hosts, os.path.realpath(playbook)]
    print('Executing: {}'.format(' '.join(cli_args)))
    cli = PlaybookCLI(cli_args)
    # Parse args and run it
    try:
        cli.parse()
        # Return the result:
        # 0: Success
        # 1: "Error"
        # 2: Host failed
        # 3: Unreachable
        # 4: Parser Error
        # 5: Options error
        return cli.run()
    except (AnsibleParserError, AnsibleOptionsError) as error:
        print('{}: {}'.format(type(error), error))
        raise error
Breaking It Down
The function starts off with some hosts parsing. This is not really needed but it does make the function easier to work with. On the command line Ansible likes to have a comma at the end of hosts passed in. This chunk of code makes sure that if a list or string is given for a host that the resulting host string is properly formatted.
    # Set hosts args up right for the ansible parser. It likes to have trailing ,'s
    if isinstance(hosts, basestring):
        hosts = hosts + ','
    elif hasattr(hosts, '__iter__'):
        hosts = ','.join(hosts) + ','
    else:
        raise AnsibleParserError('Can not parse hosts of type {}'.format(type(hosts)))
The Real Code
This chunk of code is what is actually calling Ansible. It creates the command line argument list, creates a PlaybookCLI instance, has it parsed, and then executes the playbook.
    # Create the cli object
    cli_args = ['playbook'] + args + ['-i', hosts, os.path.realpath(playbook)]
    print('Executing: {}'.format(' '.join(cli_args)))
    cli = PlaybookCLI(cli_args)
    # Parse args and run it
    try:
        cli.parse()
        # Return the result:
        # 0: Success
        # 1: "Error"
        # 2: Host failed
        # 3: Unreachable
        # 4: Parser Error
        # 5: Options error
        return cli.run()
    except (AnsibleParserError, AnsibleOptionsError) as error:
        print('{}: {}'.format(type(error), error))
        raise error
Using The Function
# Execute /tmp/test.yaml with 2 hosts
result = execute_playbook('/tmp/test.yaml', ['192.168.152.100', '192.168.152.101'])

# Execute /tmp/test.yaml with 1 host and add the -v flag
result = execute_playbook('/tmp/test.yaml', '192.168.152.101', ['-v'])
Intercepting The Output
One drawback of using the command-line interface code directly is that the output is expected to go to the user in the standard way. That is to say, it’s sent to the screen and colorized. This will probably be fine for some, but others may want to grab the output and use it in some form. While it is possible to change output through the configuration options it is also possible to monkey patch display and intercept the output for your own use cases. As an example, here is a Display class which forwards all output that is not meant for the screen only to our logging.info method.
# MONKEY PATCH to catch output. This must happen at the start of the code!
import logging

from ansible.utils.display import Display

# Set up our logging
logger = logging.getLogger('transport')
logger.setLevel(logging.INFO)
handler = logging.StreamHandler()
handler.formatter = logging.Formatter('%(name)s - %(message)s')
logger.addHandler(handler)

class LogForward(Display):
    """
    Quick hack of a log forwarder
    """

    def display(self, msg, screen_only=None, *args, **kwargs):
        """
        Pass display data to the logger.
        :param msg: The message to log.
        :type msg: str
        :param args: All other non-keyword arguments.
        :type args: list
        :param kwargs: All other keyword arguments.
        :type kwargs: dict
        """
        # Ignore if it is screen only output
        if screen_only:
            return
        logging.getLogger('transport').info(msg)

    # Forward it all to display
    info = display
    warning = display
    error = display
    # Ignore debug
    debug = lambda s, *a, **k: True

# By simply setting display Ansible will slurp it in as the display instance
display = LogForward()
# END MONKEY PATCH. Add code after this line.
Putting It All Together
If you want to use it all together it should look like this:
# MONKEY PATCH to catch output. This must happen at the start of the code!
import logging

from ansible.utils.display import Display

# Set up our logging
logger = logging.getLogger('transport')
logger.setLevel(logging.INFO)
handler = logging.StreamHandler()
handler.formatter = logging.Formatter('%(name)s - %(message)s')
logger.addHandler(handler)

class LogForward(Display):
    """
    Quick hack of a log forwarder
    """

    def display(self, msg, screen_only=None, *args, **kwargs):
        """
        Pass display data to the logger.
        :param msg: The message to log.
        :type msg: str
        :param args: All other non-keyword arguments.
        :type args: list
        :param kwargs: All other keyword arguments.
        :type kwargs: dict
        """
        # Ignore if it is screen only output
        if screen_only:
            return
        logging.getLogger('transport').info(msg)

    # Forward it all to display
    info = display
    warning = display
    error = display
    # Ignore debug
    debug = lambda s, *a, **k: True

# By simply setting display Ansible will slurp it in as the display instance
display = LogForward()
# END MONKEY PATCH. Add code after this line.

import os  # Used for expanding paths

from ansible.cli.playbook import PlaybookCLI
from ansible.errors import AnsibleOptionsError, AnsibleParserError

def execute_playbook(playbook, hosts, args=[]):
    """
    :param playbook: Full path to the playbook to execute.
    :type playbook: str
    :param hosts: A host or hosts to target the playbook against.
    :type hosts: str, list, or tuple
    :param args: Other arguments to pass to the run.
    :type args: list
    :returns: The TaskQueueHandler for the run.
    :rtype: ansible.executor.task_queue_manager.TaskQueueManager.
    """
    # Set hosts args up right for the ansible parser. It likes to have trailing ,'s
    if isinstance(hosts, basestring):
        hosts = hosts + ','
    elif hasattr(hosts, '__iter__'):
        hosts = ','.join(hosts) + ','
    else:
        raise AnsibleParserError('Can not parse hosts of type {}'.format(
            type(hosts)))

    # Create the cli object
    cli_args = ['playbook'] + args + ['-i', hosts, os.path.realpath(playbook)]
    logger.info('Executing: {}'.format(' '.join(cli_args)))
    cli = PlaybookCLI(cli_args)
    # Parse args and run it
    try:
        cli.parse()
        # Return the result:
        # 0: Success
        # 1: "Error"
        # 2: Host failed
        # 3: Unreachable
        # 4: Parser Error
        # 5: Options error
        return cli.run()
    except (AnsibleParserError, AnsibleOptionsError) as error:
        logger.error('{}: {}'.format(type(error), error))
        raise error
Pros and Cons
Of course nothing is without drawbacks. Here are some negatives with this method:
- No direct access to “TaskQueueManager“
- If the CLI changes the code must change
- Monkey patching …. ewww
But the positives seem to be worth it so far:
- You don’t have to deal with “TaskQueueManager“ and all of the construction code
- The CLI doesn’t seem to change often
- The same commands one would run on the CLI can easily be extrapolated and even run manually
Sublime or Atom
I’m a long time Vim user. I chose it initially because either Vi or Vim seemed to be available on every server I encountered. For years I used it as my sole system editor as well as my development editor. In many ways it still does both purposes as I never have been able to find an IDE that didn’t suck. Like a lot of folks I ended up enjoying programming editors and Sublime Text ended up being the one I gravitated to the most.
Why Sublime Text? Mainly due to its huge plugin ecosystem and command palate. It really transforms editing into a quicker, simpler process. The big thing that really bugged me about Sublime Text was that it was not Open Source. However, I was willing to overlook that due to the ease of use and the small assurance that it could be Open some day.
Since then GitHub came up with the Atom Text Editor which, at the time of writing, has a lot of the same features as Sublime Text, a good and growing plugin community, and is Open Source. This got me thinking if it was time to make the switch from Sublime Text over to Atom.
Ideology
Let’s just get this out of the way! Atom gets an automatic leg up in my book because the source is Open. I can hack on it if I feel the need. Chances are I won’t actually ever modify the editor but it is nice to know I can do so if I wish. It’s also nice to know that if the project fell over or took a wrong turn the community could fork it and continue development on their own terms. Obviously, not everyone will have the want for Openness.
Speed
Sublime Text wins this hands down. I have a feeling that Sublime is faster due to their use of Python versus Atom using Javascript. Earlier on in Atoms history it was pretty painfully slow, but that is no longer the case. Atom just isn’t as fast as Sublime Text and it’s most noticeable upon start up. From that point forward it’s speedy enough. Heck, it still feels snappier than Eclipse!
Stability
Sublime Text comes out slightly ahead in this area. I’ve not had either editor crash on me yet but Atom has had some oddities in its plugin update system that exiting and restarting the editor fixed. That’s a minor problem, but the closest I’ve had with Sublime was one specific plugin, which required lots of extra configuration and dependencies, acted up when an external dependency couldn’t be met.
Default Features
Sublime Text wins this, at least from a Python developer point of view. The auto complete and syntax highlighting used in Sublime Text is much, much better out of the box. Atom can be significantly improved over its default via plugins though I still have yet to have the same level of auto complete and look up that Sublime Text can provide (with or without plugins).
Configurability
Atom wins this easily. Not only is the plugin community growing quickly (at least from the outside user perspective) but the core is modifiable if you feel the need to make sweeping changes.
As an end user I can also say the configuration system used with Atom is easier to follow. While I don’t dislike Sublime Texts “every configuration is a JSON file” system it’s nice to be able to see all configuration within Atoms UI and use traditional UI means to modify the configuration. I’m sure one can go straight to configuration file editing if they’d like, but it is quicker to glance at a configuration screen than read through all the possibilities available in a JSON text file.
User Interface
Atom wins here as well. Not only is the settings UI a nice feature but the package system is default in Atom and easy to use from the editor itself. This makes search and installation of plugins simpler than it is in Sublime Text. Other than that most everything else works exactly the same way between the two editors.
On a side note I am kind of disappointed with Atoms default Git integration. I would have expected it to be stronger due to it being a GitHub project. Luckily Git-Plus picks up the slack.
Conclusion
I’m moving to Atom. While Sublime Text is more mature Atom is catching up quick and has what seems like a strong and growing community of users and developers. Sublime Text has a pretty good plugin community but the Open nature of Atom is enough of a pull for me to put up with the minor pitfalls it has when stacking it up against Sublime Text.
etcdobj: A Minimal etcd Object Mapper for Python
I didn’t have a lot on my agenda Friday. I wanted to review and return emails, do some reading, get some minor hacking on etcdobj done (more on that…), eat more calories then normal in an attempt to screw with my metabolism (nailed it!), catch up with a few coworkers, play some video games, and, apparently, accidentally order an air purifier from Amazon. I succeed in all of it. But on to this etcdobj thing…
While working on Commissaire I started to feel a bit dirty over storing json documents in keys. It’s not uncommon, but it felt like it would be so much better if a document was broken into three layers:
- Python: Classes/Objects
- Transport: For saving/retreiving objects
- etcd: A single or series of keys
By splitting up what normally is json data into a series of keys and two clients change overlapping parts of an object there won’t be a collision or require the client to fail, fetch, update, then try saving again. I searched the Internet for a library that would provide this and came up wanting. It seems that either simple keys/values or shoving json into a key is what most people stick with.
etcdobj is truly minimal. Partly because it’s new, partly because being small should make it easier to build upon or even bundle (it’s got a very permissive license), and partly because I’ve never written an ORM-like library before and don’t want to build to much on what could be a shaky foundation. That’s why I’m hoping this post will encourage some more eyes and help with the code.
Current Example
To create a representation of data a class must subclass EtcdObj and follow a few rules.
- __name__ must be provided as it will be the parent in the key path.
- Fields are class level variables and must be set to an instance that subclasses etcdobj.Field.
- The name of a field is the next layer in the key path and do not need to be the same as the class level variable.
from etcdobj import EtcdObj, fields

class Example(EtcdObj):
    __name__ = 'example' # The parent key
    # Fields all take a name that will be used as their key
    anint = fields.IntField('anint')
    astr = fields.StrField('astr')
    adict = fields.DictField('adict')
Creating a new object and saving it to etcd is pretty easy.
server = Server()

ex = Example(anint=1, astr="hello", adict={"hi": "there"})
ex.anint = 100  # update the value of anint
server.save(ex)
# Would save like so:
# /example/anint = "100"
# /example/astr = "hello"
# /example/adict/hi = "there"
As is retrieving the data.
new_ex = server.read(Example())
# new_ex.anint = 100
# new_ex.astr = "hello"
# new_ex.adict = {"hi": "there"}
Ideas
Some ideas for the future include:
- Object watching (if data changes on the server it changes in the local instance)
- Object to json structure
- Deep DictField value casting/validation
- Library level logging
Lend a Hand
The code base is currently around 416 lines of code including documentation and license header. If etcdobj sounds like something you’d use come take a look and help make it something better than I can produce all by my lonesome.
